I Burned Through $300 Before Learning How to Aquascape a Tank on a Budget
Let me tell you about the $300 I lit on fire before I figured out how to aquascape a tank on a budget. And no, I’m not being dramatic. Between the fancy ADA substrate I didn’t need, the premium driftwood that leached tannins for six months, and the “beginner-friendly” plants that melted within a week, my first serious aquascaping attempt was a masterclass in what NOT to do.
Here’s the thing about aquascaping YouTube: it’s basically equipment porn. Gorgeous tanks with $200 lights, CO2 setups that cost more than my rent, and hardscape pieces that look suspiciously like someone’s entire paycheck. When I was starting out, fresh off the guilt of losing Gerald the betta to my own ignorance about cycling, I thought expensive meant better. I thought you needed all of it.
You don’t.
After seven tanks (yes, my apartment is basically a fish hotel at this point), I’ve learned that the difference between a stunning aquascape and a forgettable one has almost nothing to do with your budget. It comes down to understanding a few core principles: composition, patience, and knowing where to splurge versus where to save.
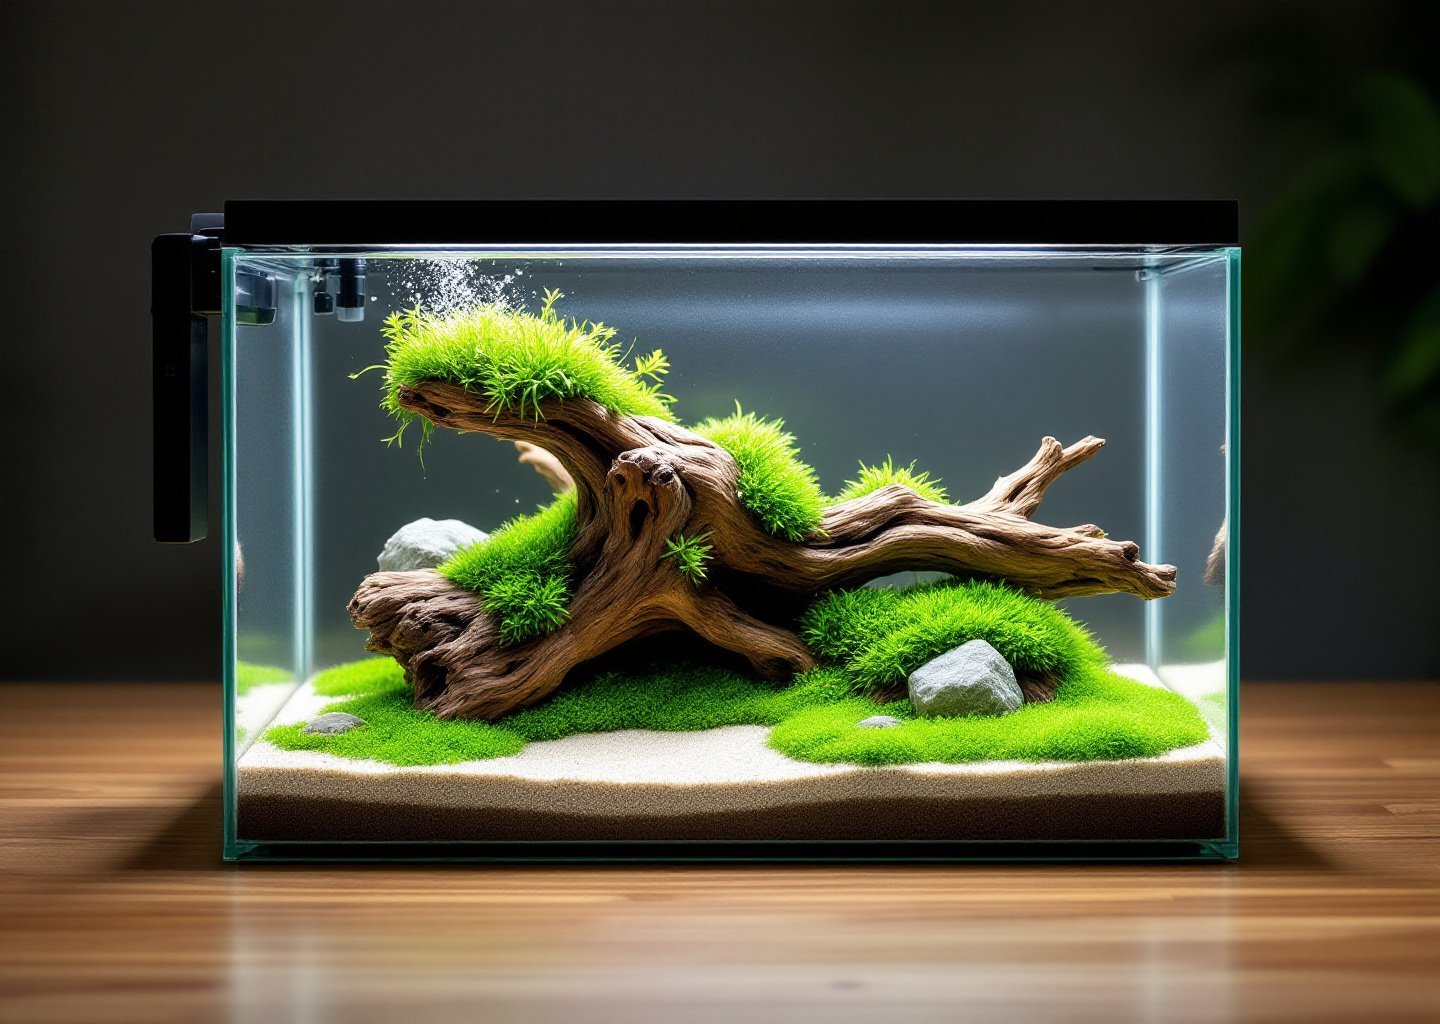
For this breakdown, I’m walking you through my latest nano tank build that cost exactly $47.23. I’ll share the receipts, the mistakes, and the stuff that actually worked versus what the gear-obsessed corners of the internet tried to sell me on.
The $47 Nano Tank Build: Complete Cost Breakdown with Photos and Sourcing Tips
So where did every dollar actually go?
The actual costs:
– 5-gallon tank from Petco’s dollar-per-gallon sale: $5.00
– Sponge filter + air pump combo (Amazon Basics): $12.99
– Adjustable heater (Aqueon 50W): $14.99
– Organic potting soil (Miracle-Gro, no fertilizer beads): $4.25
– Pool filter sand, 10 lb bag: $3.50
– Plants (more on this below): $6.50
– Hardscape: $0 (collected responsibly)
Total: $47.23
Now, a few notes on sourcing. That dollar-per-gallon sale at Petco runs several times a year, though the timing varies. Keep an eye on their announcements and sign up for email alerts so you don’t miss it. Petco sale schedule I’ve also scored perfectly good tanks from Facebook Marketplace and Craigslist for literally nothing. People upgrade, move, or lose interest, and their old equipment becomes your treasure.
Why am I obsessed with sponge filters for nano tanks? Hang-on-back filters create too much flow for small spaces, and sponge filters double as biological filtration while providing grazing surfaces for shrimp. Win-win.
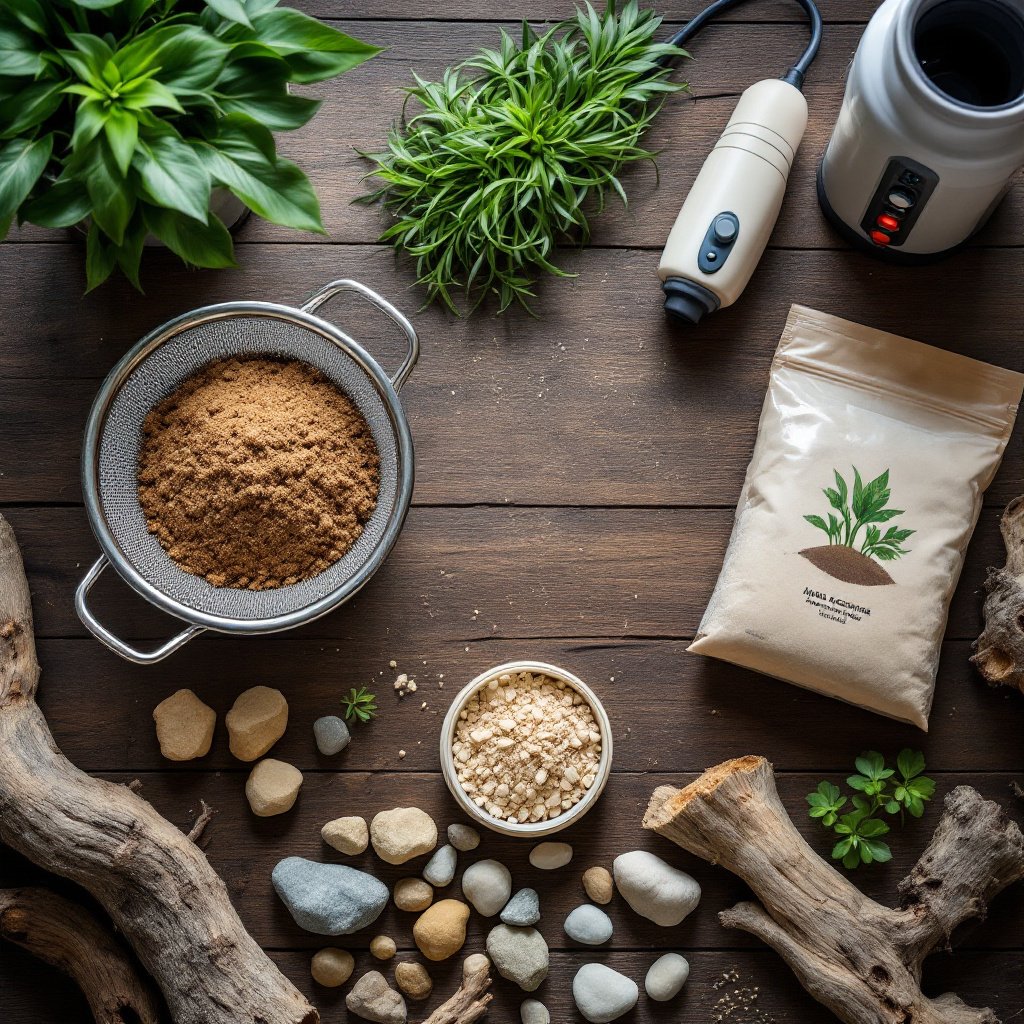
Free Hardscape Hunting: DIY Driftwood Preparation and Safe Rock Collection from Nature
My thrifting instincts really shine here. Why pay $40 for a piece of spider wood when your local hiking trail is basically a free aquascaping supply store?
DIY driftwood preparation for aquarium (free):
Fallen branches from local parks work perfectly (never cut from living trees, please). Look for hardwoods like oak, maple, or fruit woods. Avoid anything aromatic like cedar, pine, or eucalyptus because the oils will wreck your water chemistry.
Here’s my preparation process:
1. Scrub the wood thoroughly with a stiff brush under running water.
2. Boil for 2–3 hours, changing the water when it turns brown.
3. Soak in a bucket for 1–2 weeks, changing water daily.
4. Test pH before adding to your tank.
Yes, this takes time. But the piece in my $47 build? Found on a camping trip in the Columbia River Gorge. It looks better than anything I’ve seen at my local fish store for $60.
Safe rock collection:
Not all rocks are aquarium-safe. Your best friend here is the vinegar test: drop some white vinegar on the rock. If it fizzes, it contains calcium carbonate and will raise your pH and hardness. Skip it unless you’re keeping African cichlids.
Granite, slate, and river rocks are my go-to choices for DIY aquascape hardscape ideas. Collecting them from public lands where it’s legal, scrubbing them clean, and maybe boiling them if I’m feeling paranoid takes minimal effort.
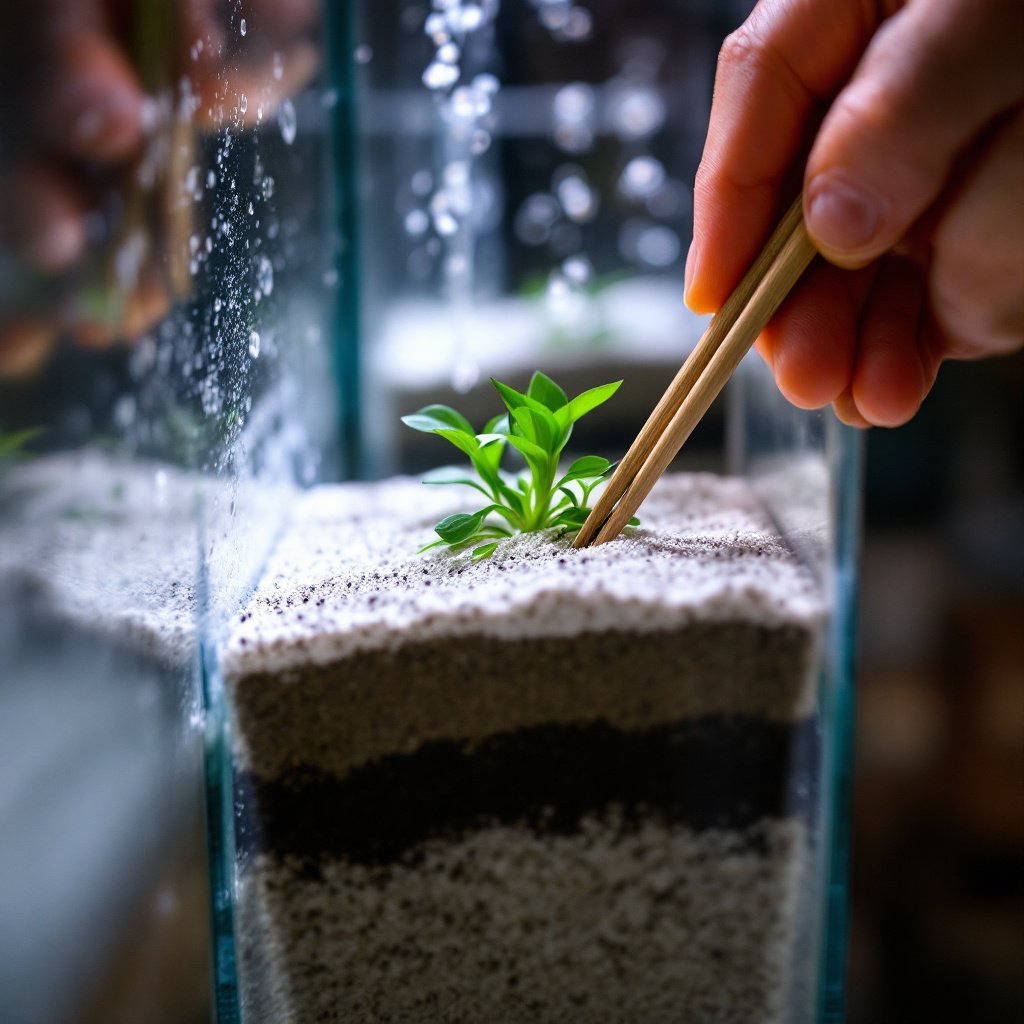
Dirt Substrate Capped with Sand: Step-by-Step Setup That Outperforms $40 Planted Tank Soil
Here’s the dirty secret (pun intended) that aquasoil companies don’t want you to know: a dirt substrate capped with sand in a planted tank will grow plants just as well as their $40 bags. Often better, because the organic matter in potting soil releases nutrients slowly over years, not months.
My setup process:
- Screen your organic potting soil to remove large debris and those pesky white fertilizer beads. A mesh kitchen strainer works great.
- Soak the soil for 24 hours, stirring occasionally. Doing this helps release initial ammonia and makes it easier to work with.
-
Add a 1-inch layer of damp soil to your tank. Slope it from back to front for depth perception. My graphic design brain can’t help but think about visual composition.
-
Cap with 1–1.5 inches of pool filter sand. Capping prevents the soil from clouding your water and gives you a clean look.
-
Fill slowly using a plate or bag to diffuse water flow. Your first fill will still be slightly murky. That’s normal.
Important: Your setup needs to cycle for 2–3 weeks before adding fish. The initial ammonia spike from the soil is real. nitrogen cycle guide Learn from Gerald’s fate.
Best Cheap Aquarium Plants Under $5: Low-Tech Species That Carpet and Fill Without CO2
Aquascaping without CO2 injection is absolutely possible. Six of my seven tanks prove it. You just need plants that don’t demand much light or CO2, ones that evolved in lower-light environments.
My go-to cheap aquarium plants for beginners:
- Java moss ($3–4 for a golf ball portion): Attach to driftwood, spread it around, forget about it. Grows like a weed and creates beautiful natural texture.
-
Anubias nana petite ($5–7 per rhizome): Slow-growing but bulletproof. Tie it to rocks or wood. Never bury the rhizome, or it’ll rot.
-
Cryptocoryne wendtii ($4–5): Will melt dramatically when you first plant it, then come back stronger. Don’t panic when the leaves turn to mush.
-
Dwarf sagittaria ($3–4 for 3–5 plants): Probably the best cheap carpeting plant, and no CO2 injection required. Spreads via runners and creates a grassy look.
-
Water sprite ($2–3): Fast-growing stem plant that sucks up excess nutrients. Can float or be planted. Great for combating algae in new setups.
For my $47 build, I grabbed a portion of java moss and a handful of dwarf sag from a local hobbyist selling trimmings on r/AquaSwap. Best $6.50 I’ve spent.
The best cheap aquarium plants for beginners under $5 are always the “boring” ones that serious aquascapers overlook. They’re boring because they don’t die. I’ll take boring over beautiful-but-dead any day.
Budget Lighting That Actually Grows Plants: What Wattage You Need vs. What Companies Sell You
Lighting is where companies really try to upsell you. But what actually matters for budget aquarium lighting for plant growth?
For low-tech, no-CO2 tanks like mine, you need about 20–40 PAR (Photosynthetically Active Radiation) at substrate level. Sounds technical, but it basically means “enough light to grow plants, not enough to grow algae.”
What I use:
- NICREW ClassicLED for tanks under 10 gallons: Prices vary by size and retailer, so shop around for the best deal.
- Generic clamp lights with 6500K LED bulbs from the hardware store: Under $15 total.
That’s it. Premium programmable lights like the Fluval Plant 3.0 are gorgeous and feature-packed but absolutely unnecessary for a budget build. Save it for when you catch the high-tech bug. And you might, because this hobby is a slippery slope.
The wattage myth:
Old-school advice about “watts per gallon” is outdated. LED efficiency varies wildly. What matters is light color (6500K mimics daylight, which plants love) and intensity at substrate level.
Run your lights 6–8 hours daily. More light doesn’t mean faster growth; it means more algae. Tank number three taught me that one the hard way.
Dollar Store Aquarium Hacks: 7 That Work, 4 That’ll Kill Your Fish (Learned the Hard Way)
Ah, the dollar store. Land of both genius aquarium hacks and silent fish killers. Here’s what trial and error has taught me:
Dollar store aquarium decor hacks that actually work:
- Plastic mesh containers for planting: Cut them up for plant anchors or moss walls.
- Turkey basters for spot-feeding and debris removal.
- Toothbrushes for scrubbing algae off hardscape.
- Spray bottles for misting plants during setup.
- Plastic containers for quarantine or plant holding.
- Aquarium-safe silicone for attaching moss (check it’s 100% silicone, no mold inhibitors).
- Chopsticks as the best affordable aquascaping tools. Perfect for planting and adjusting.
What will harm your fish:
- Decorative glass gems/marbles not labeled aquarium-safe: May contain dyes or coatings that can leach into your water. Stick to products specifically marketed for aquarium use.
- Plastic plants from the craft section: Dyes leach into water.
- Metal anything: Rust city, population: your fish.
- Ceramic items not labeled food-safe: May contain toxic glazes.
When in doubt, skip it. That $2 you save isn’t worth poisoning your tank.
Look, learning how to aquascape a tank on a budget isn’t about deprivation. It’s about understanding that this hobby rewards patience and creativity over credit card swipes.
Your $50 starter shopping list:
- Tank (5–10 gallon during sales): $5–10
- Sponge filter + air pump: $13
- Heater: $15
- Organic potting soil: $5
- Pool filter sand: $4
- 2–3 easy plant species: $8–10
- Hardscape: $0 (get outside!)
30-day growth expectations:
- Week 1: Your tank looks empty and sad. Plants might melt. Completely normal.
- Week 2: New growth appears. Water clears. You feel hope.
- Week 3: Runners start spreading from carpeting plants. Java moss perks up.
- Week 4: You can finally see the vision. And you’re already planning tank number two.
My $47 build is now four months old. Dwarf sag has carpeted the foreground, java moss has taken over the driftwood, and the whole thing looks like I spent way more than I did. My design brain is satisfied with the composition, and my wallet is relieved.
The best part? When someone asks about it, I get to tell them the truth: aquascaping doesn’t have to be expensive. It just has to be intentional.
Now if you’ll excuse me, I need to go convince my partner that a 10-gallon in the kitchen would really tie the room together.
Have questions about budget aquascaping? Drop them in the comments. And remember: every expert aquascaper started with a murdered fish and a dream. RIP Gerald, you taught me everything.